How to replace a chain-drive garage door opener motor

This DIY repair guide explains how to replace the motor on a chain-drive garage door opener. The motor turns the sprocket, which drives the chain to open and close the door. If the motor won't start when you activate it, replace it with the manufacturer-approved replacement part.
Follow these steps to replace the motor in Craftsman, Chamberlain and LiftMaster chain-drive garage door openers.
This video explains how to replace the motor on a chain-drive garage door opener.
Instructions
- 01.
Disconnect power
Use a step ladder to access the garage door opener’s power cord and motor unit.
Unplug the garage door opener.
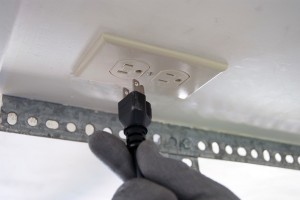
PHOTO: Unplug the garage door opener.
- 02.
Take the garage door opener down
Position a work table near the area under your motor unit to hold the garage door opener during the repair.
Pull the emergency release rope to release the trolley from the garage door.
Shut the garage door if it's not already closed.
Remove the fastener ring from the straight door arm connected to the outer trolley.
Pull out the clevis pin while supporting the straight arm to disconnect the garage door from the outer trolley.
Lower the straight and curved arms down and rest them against the garage door.
Open the light cover to access the wall control and safety sensor wires connected to the motor unit.
Take a digital photo of the wall control and safety sensor wires connected to the motor unit. You'll refer to the photo later when reconnecting the wires.
Disconnect the wall control and safety sensor wires from the motor unit.
Close the light cover.
Remove the nuts, bolts, and lock washers that secure the motor unit to the ceiling bracket. Support the motor unit with one hand as you remove the last bolt from the ceiling bracket. Use a helper if necessary.
Carefully lower the motor unit down and rest it securely on top of the step ladder.
Climb down the step ladder, lower the motor unit down and rest it on your worktable.
Move your step ladder by the garage door so you can remove the rail from the header bracket.
Remove the fastener ring from the header bracket clevis pin.
Pull the clevis pin out of the rail and header bracket while supporting the rail with one hand.
Lower the rail and rest it on a rung of the step ladder so the rail is level with the motor unit on your work table.
Tip: To avoid scratching a decorative garage door, remove the nuts, bolts and washers from the curved arm and carefully rest the curved arm against the door when disconnecting the garage door from the outer trolley.Tip: You may want to have a helper assist you when pulling the garage door opener down.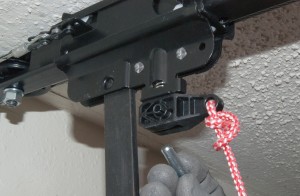
PHOTO: Disconnect the arm from the trolley.
- 03.
Remove the motor
Remove the light covers and light bulbs from the motor unit.
Flip the motor unit over, remove the screws from the motor unit cover and pull the cover off.
Remove the plastic helical gear retainer and pull the helical gear off.
Unplug the RPM sensor wire harness.
Release the limit switch locking tabs by squeezing the sides just below the motor bracket near the helical gear.
Move the limit switch aside and let it hang by its wires.
Note the location of motor wire connections so you can connect the new motor wires.
Unplug the motor wires from the capacitor and terminal block.
Remove the bottom screws from the motor plate and pull the motor and motor plate out.
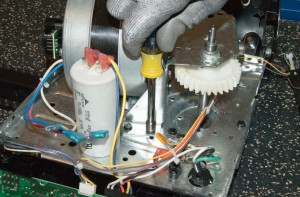
PHOTO: Replace the chain-drive motor mounting screws.
- 04.
Install the new motor
Position the new motor and motor plate over the motor unit and line up the gear and sprocket shaft with the main bearing on the motor plate.
Lower the motor and motor plate down, threading the gear and sprocket shaft through the main bearing.
Fasten the new motor plate and motor to the motor unit using the bottom mounting plate screws.
Connect the new motor wires to the capacitor and terminal block.
Reinstall the helical gear on the gear and sprocket shaft and secure it with the retaining clip.
Lubricate the helical gear with general purpose grease if it's dry.
Position the limit switch on the motor bracket and snap the limit switch into place, engaging the limit switch drive gear with the helical gear.
Install the RPM sensor on the motor plate by snapping the RPM sensor mounting posts into the motor plate holes.
Plug in the RPM sensor wire harness. Reinstall the motor unit cover and secure it with the mounting screws.
Flip the motor unit upright and reinstall the light bulbs and light bulb covers.
PHOTO: Connect the motor wires.
- 05.
Reinstall the garage door opener
Reconnect the rail end to the header bracket using the clevis pin and fastener ring.
Position your step ladder under the motor unit ceiling bracket and carefully set the motor unit on top of the step ladder.
Climb the step ladder and reinstall the motor unit to the ceiling bracket using the nuts, bolts and lock washers.
Open the light cover to access the wall control and safety sensor terminals on the motor unit.
Using your digital photo for reference, reconnect the wall control and safety sensor wires to the motor unit.
Close the light cover.
Reconnect the straight door arm to the outer trolley using the clevis pin and fastener ring.
Re-engage the trolley.
Tip: Reconnect the curved door arm to the straight door arm using the bolts, lock washers and nut if you disconnected the curved arm from the straight arm when freeing the garage door from the outer trolley.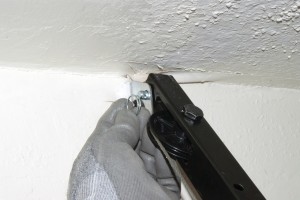
PHOTO: Reinstall the rail on the header bracket.
- 06.
Reconnect electrical power
Plug in the garage door opener.
- 07.
Adjust the travel limits
Run the garage door opener through a complete travel cycle to check upper and lower travel limits.
If the garage door doesn't close completely, adjust the down travel and cycle the door open and closed to test the adjustment. Continue to adjust the down travel until the door closes completely.
If the door doesn't open completely, adjust the up travel in the same manner.
Tip: Repeated operation of the garage door opener during travel limit adjustment may cause the motor to overheat and shut off. Wait 15 minutes to allow the motor to cool and then continue adjustments.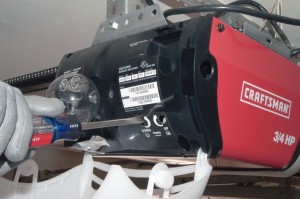
PHOTO: Adjust the travel limits.


Most common symptoms to help you fix your garage door openers
Choose a symptom to see related garage door opener repairs.
Main causes: garage door opener misaligned, travel limits need adjustment, bad travel limit switches, faulty logic contr…
Main causes: garage door locked, damaged garage door tracks, up-force setting needs adjustment, RPM sensor failure, bad …
Main causes: safety sensor beams blocked, safety sensors not aligned, downforce setting needs adjustment, damaged garage…
Things to do: check garage door travel, tighten brackets and fasteners, test safety sensors, check travel limits and for…
Main causes: radio interference, weak remote batteries, sunlight interference with safety sensor beams, safety sensors n…
Main causes: faulty logic control board, bad RPM sensor, broken gears in the drive system, bad drive motor…
Main causes: neighbor's remote programmed at the same time as yours, faulty wall control wiring, bad wall control unit…
Main causes: loose fasteners, broken brackets, need preventive maintenance, worn drive gears, loose or worn belt, loose …
Most common repair guides to help fix your garage door openers
These step-by-step repair guides will help you safely fix what’s broken on your garage door opener.

How to replace a chain-drive garage door opener gear and sprocket assembly
Learn how to replace the gear and sprocket assembly on your garage door opener if the drive motor runs but the door won'…

How to replace a garage door opener logic board
The logic board is the brains of the garage door opener. If the remote doesn't work or the door doesn't open and close p…

How to replace a garage door opener drive chain and cable assembly
If your garage door won’t move, the chain and cable assembly on your garage door opener could be broken. Follow these st…
Effective articles & videos to help repair your garage door openers
Use the advice and tips in these articles and videos to get the most out of your garage door opener.

Learn how to repair broken, frayed or damaged wires in your appliances.…

If your remotes don't work, you might need to disable the lock feature, eliminate RF interference or check the batteries…

Learn how to use a multimeter to check for wiring problems in an appliance that's not working…