How to replace a lawn mower front deck tray
The step-by-step instructions in this DIY lawn mower repair guide explain how to replace the front deck tray on a lawn mower. The front deck tray houses the transmission and wheel axle on a front-wheel drive lawn mower. The end of the drive cable attaches to an anchor post on the deck tray. If the anchor post breaks, the drive cable won't engage the transmission, and the mower won't move forward. Replace the front deck tray with the manufacturer-approved lawn mower part.
Use this procedure to replace the front deck tray transmission in common Craftsman and MTD walk-behind lawn mowers.
A broken front deck tray is just one reason a lawn mower won't drive forward. To learn how to diagnose a lawn mower drive problem, see Lawn Mower Won't Move Troubleshooting Video: Motion Drive Failure.
This video explains how to replace the front deck tray on a walk-behind lawn mower.
Instructions
- 01.
Disconnect the spark plug wire
Disconnect the spark plug wire from the spark plug.
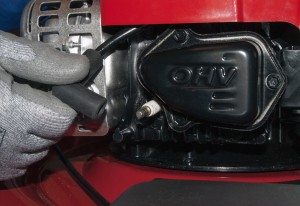
PHOTO: Disconnect the spark plug.
- 02.
Remove the drive cover and front deck tray mounting screws
Pull the drive control lever up and clamp it to the mower handle to keep the drive belt tight as you remove the deck tray mounting screws.
Remove the fuel tank cap.
Place a plastic bag over the fuel tank opening and reinstall the fuel tank cap to prevent gasoline from leaking out through the fuel tank cap vent.
Remove the top drive cover mounting screws.
Tilt the mower back to lift the front wheels then secure the mower handle to your work table to hold the mower steady as you remove bottom-mounting screws.
Remove the bottom drive cover mounting screws.
Remove the front deck tray mounting screws.
Release the mower handle from the work table and carefully lower the mower to the upright position.
Tip: Keep the front deck mounting screws separate from the drive cover mounting screws because they are different sizes.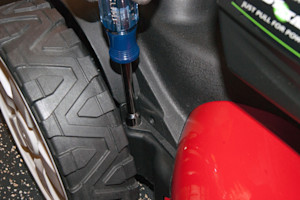
PHOTO: Remove the top drive cover screws.
- 03.
Release the ground drive belt
Release the height adjuster lever and pull off the drive cover.
Remove the clamp from the drive control lever, letting the control lever drop to the disengaged position.
Pull off the transmission belt keeper.
Roll the ground drive belt off the transmission pulley.
Attach one end of the bungee cord to the drive belt and the other end to the rear discharge chute door lip to prevent the belt from slipping off the engine pulley while replacing the front deck tray.
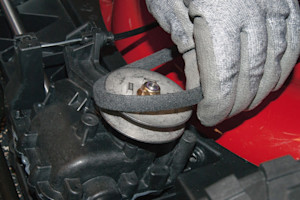
PHOTO: Release the drive belt.
- 04.
Release the drive control cable
Release the drive cable from the drive control lever.
Remove the drive cable end from the anchor post.
Depress the release tabs and pull the drive cable out of the transmission lever.
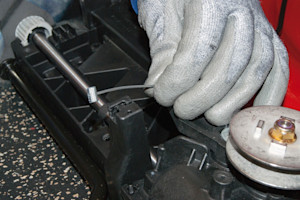
PHOTO: Release the drive cable.
- 05.
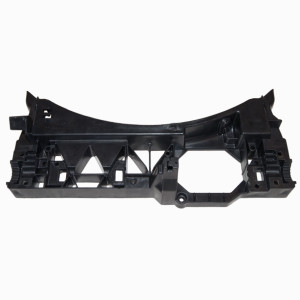
Remove the front deck tray
Remove the transmission axle clip.
Pull the transmission and wheel axle up slightly then disconnect the tension spring pin from the transmission.
Remove the transmission and wheel axle.
Disconnect the tension spring pin from the front deck tray.
Remove the front deck tray.
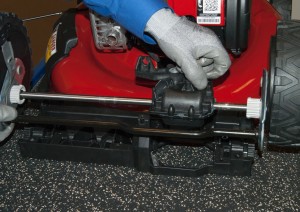
PHOTO: Remove the transmission and wheel axle.
- 06.
Install the new front deck tray
Install the tension spring pin on the new front deck tray.
Position the transmission and wheel axle above the front deck tray and reconnect the transmission to the tension spring pin.
Reinstall the transmission axle clip.
Release the drive belt from the bungee cord while you keep tension on the drive belt to prevent it from slipping off the engine pulley.
Reconnect the drive belt to the transmission then reinstall the belt keeper.
Push the drive cable into the transmission lever and engage the locking tabs.
Reconnect the drive cable end to the anchor post.
Reconnect the drive cable to the drive control lever on the lawn mower handle.
Use one hand to support the front deck tray and carefully tilt the mower back to raise the front of the deck along with the front deck tray. Make sure that the mower deck tabs engage the slots in the new front deck tray so that the deck tray lifts up with the deck when tilting the mower back.
Secure the mower handle to your work table to hold the mower steady as you reinstall the bottom-mounting screws.
Reinstall the front deck tray mounting screws.
Position the drive cover on the mower and re-engage the height adjuster lever.
Reinstall the bottom mounting screws in the drive cover.
Look through the opening in the debris shield to make sure the drive belt is still connected to the engine pulley. If the drive belt worked its way off the engine pulley during the repair, then follow the steps in the repair guide for drive belt replacement to reconnect the drive belt to the engine pulley.
Release the mower handle from the work table and tilt the mower upright.
Reinstall the drive cover top mounting screws.
Remove the plastic bag from the fuel tank opening and reinstall the fuel tank cap.
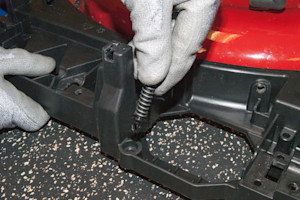
PHOTO: Install the tension spring.
- 05.
Reconnect the spark plug wire
Push the spark plug wire back onto the spark plug.

Symptoms for gas walk-behind mowers
Choose a symptom to see related walk-behind mower repairs.
Main causes: engine needs tune up, dirty or clogged carburetor, damaged flywheel key…
Main causes: uneven wheel height settings, damaged wheel, dull or damaged cutting blade…
Main causes: damaged cutting blade, loose cutting blade, damaged flywheel key, engine needs tune up…
Main causes: stale gas, engine needs tune up, bad spark plug, dead battery, bad recoil starter, faulty safety switch, ba…
Main causes: dirty carburetor, bad spark plug, clogged air filter, engine choke problems, clogged gas cap vent…
Main causes: drive control cable failure, worn or broken drive belt, bad transmission, broken drive wheel…
Repair guides for gas walk-behind mowers
These step-by-step repair guides will help you safely fix what’s broken on your walk-behind lawn mower.

How to replace a lawn mower spark plug
Take a few minutes to replace the spark plug during your lawn mower's annual tune-up or if the spark plug is burnt or cr…

How to replace a lawn mower blade
Check your lawn mower blade regularly and replaced it if it's bent or damaged. …

How to replace a lawn mower flywheel key on a flathead engine
When you hit a hard object with your mower, the flywheel can shear to protect more expensive components. Learn how to re…
Effective articles & videos to help repair your walk-behind mowers
Use the advice and tips in these articles and videos to get the most out of your walk-behind lawn mower.

Learn about a new feature added to the Search Bar on Sears PartsDirect…

Learn about Sears Technical Institute and the advanced technical content being developed for aspiring appliance techs.…

Get answers to frequently asked questions about Sears and Sears PartsDirect.…